This chapter contains the following topics:
Comparing Information for All Accounts
Chart of Accounts Organization
The Chart of Accounts selection enables you to enter your General Ledger accounts.
In addition to entering accounts, you can:
| • | Print a list of the accounts. |
| • | Print a Chart of Accounts Change Log (if you chose in Company information to use change logs). |
| • | Enter an unlimited number of notes about each account. |
| • | Display a summary of account activity, by period, for each account in the Chart of Accounts. |
| • | Enter budget figures. |
| • | Enter comparative figures. |
If you have previously set up the Valid G/L Accounts for other Passport Business Solutions modules, such as Accounts Receivable, Accounts Payable, Payroll, Inventory Control, and/or Job Cost, you can do a partial setup of the Chart of Accounts by using the procedure described in the Set-up Procedures documentation.
If you do this partial setup, the Chart of Accounts includes the account numbers and descriptions of all accounts listed in the Valid G/L Accounts. You must enter the remaining information for the Chart of Accounts manually.
Passport recommends that you organize your accounts by main account number. Here is an example of one possible method of numbering accounts:
|
Asset Accounts |
1000 to 1999 |
|
Liability Accounts |
2000 to 2999 |
|
Owner’s Equity Accounts |
3000 to 3999 |
|
Revenue Accounts |
4000 to 4999 |
|
Cost of Sales Accounts |
5000 to 5999 |
|
Expense Accounts |
6000 to 6999 |
Keep in mind that the Trial Balance prints in account number order for different groups of accounts (including subtotals).
For the subtotaling feature to be of value, group the accounts so that subtotals are meaningful. For example, you could group Current Assets and Fixed Assets separately. Then, within Current Assets, you could show Cash, Prepaid Expenses, and Inventory, each with its own subtotals.
To plan the position of subtotals, it helps to lay out your entire Chart of Accounts on a sheet of paper. The example below is a simplified Chart of Accounts that demonstrates how the first three subtotaling levels work. (Subtotaling is described in detail in Financial Statement Layouts.)
|
Account |
Description |
Subtotal Level |
|
1010-000 |
Cash, first national bank |
|
|
1020-000 |
Cash, first state bank |
1 |
|
1040-000 |
Petty cash |
2 |
|
1100-000 |
Accounts receivable |
|
|
1200-000 |
Merchandise inventory |
3 |
The Trial Balance would print as follows:
|
Account |
Description |
Balance |
||
|
1010-000 |
Cash, first national bank |
10,000 |
|
|
|
1020-000 |
Cash, first state bank |
10,000 |
|
|
|
|
Subtotal Level 1: |
20,000 |
|
|
|
1040-000 |
Petty cash |
100 |
|
|
|
|
Subtotal Level 2: |
|
20,100 |
|
|
1100-000 |
Accounts receivable |
25,000 |
|
|
|
1200-000 |
Merchandise inventory |
15,000 |
|
|
|
|
Subtotal Level 3: |
|
|
60,100 |
In this example, only main account and subaccount are shown. The subtotal levels are used to show the relationship between various asset accounts. The first subtotal level shows total cash in banks, the second shows total cash assets, and the third shows total current assets. If cost centers are used, you would put subtotals within each cost center as desired.
The rules for inserting subtotal levels are highly flexible. The main rules to remember are:
| • | Have your accounts in logical order. |
| • | After a subtotal is printed, its stored total and the stored totals of all lower subtotals are set to zero. In the example above, the first subtotal is set to zero after it is printed. |
If Petty Cash had been given a subtotal level of 1 instead of 2, the amount of that subtotal would be 100.00, instead of 20,100.00. (Subtotals do not get added together; only the accounts are subtotaled.)
If subtotals had been used later for level 4 and higher levels, they would include the subtotals for level 1, level 2, and level 3.
A subtotal level the same as or less than the last one used does not include the earlier subtotal amounts in its subtotal.
Select
Chart of Accounts from the G/L menu.
Graphical Mode
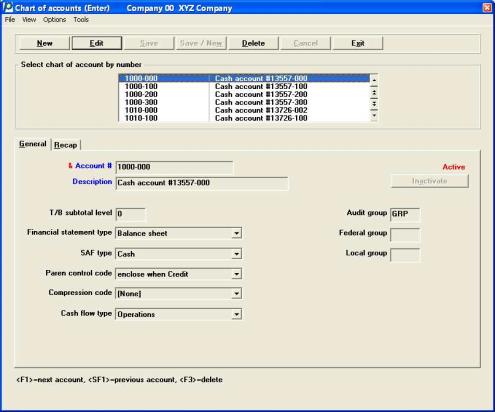
The following screen appears:

From this screen you can work with both new and existing accounts.
The list box displays up to 6 existing accounts at a time. You may sort the accounts by account number or description both in ascending or descending order. To select a field or change the sort order, click on the column name or the arrow to the right of the column name or use the View options. Only column names in red may be sorted.
To locate an account, start typing a account number or description depending on which sort field is selected. You may also use the up/down arrows, Page up, Page down, Home and End keys to locate a checking account.
Accounts that display in the list box are available for changes or deletion. The fields for the selected account display in the lower part of the screen.
When an account is found, you may select the <Enter> key or Edit button to start editing the account.
When adding a new entry or editing an existing entry, you have the following button options:
|
Button |
Keyboard |
Description |
|
New |
Alt+n |
To enter a new account |
|
Edit |
Alt+e |
To edit an existing account |
|
Delete |
Alt+d |
To delete and existing account |
|
Save |
Alt+s |
To save the new or edited account |
|
Save/New |
Alt+w |
To save the new or edited account with the program ready to enter a new account |
|
Cancel |
Alt+c |
To cancel the entry of the new account or cancel the editing of an existing account. |
Select the Exit button or <Alt+x> to return to the menu.
Menu Selections
Menu selections are available starting at the top left of the screen. Most of these are the same from screen to screen. If a menu selection is grayed out you will not be able to access it. The selection that is unique to this screen is explained here:
From the Options menu selection, you may enter Using Notes, Budgets and Comparatives.
Character Mode
The following screen appears:
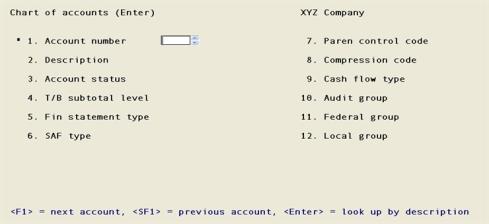
In character version you have the following option:
|
<F2> |
Summarize 2099 accounts for XDBC reporting
If you are accessing the chart of accounts using XDBC, you may use this utility to summarize the account information in the chart of accounts fields. Unless you are using XDBC and accessing the Chart of Accounts (CHARTF), these fields are normally not needed because the data is accumulated on the fly from data in G/L transactions (TRXFIL) and displayed in the Account Recap. Keep in mind that this only summarizes data for the current year.
In order to be up-to-date, you must run this utility before accessing the data in XDBC. |
Enter the following information:
Enter the full account number. The actual structure (whether cost centers or subaccounts are used, and segment sizes and types) varies according to the way the general ledger account number is defined in Company information. Remember to press <Enter> after each segment in your account number.
In character mode you may use one of the options:
|
<F1> |
For the next account |
|
<SF1> |
For the previous account |
|
<F2> |
Summarize 9999 accounts for XDBC reporting. The results for this is only accessible and visible if you are using XDBC which provides ODBC compatibility. |
Defining cost centers and sub-accounts
If you are using cost centers or subaccounts, you must define them first. Refer to the Cost Centers or Sub Accounts chapter of the System User documentation.
An alternative (and faster) method to enter cost centers or subaccounts into the Chart of Accounts is described in the Set-up Procedures chapter. The Set-up procedures selection allows you to copy a cost center or subaccount and all its accounts, either from the same company or from a different company.
|
Format |
Your standard account number format, as defined in Company information |
|
Example |
Enter account 4010-000 |
Enter the account description.
|
Format |
30 characters |
|
Example |
Type Sales - tools |
This button determines if this account is active.
Options
The button options are either:
|
Activate |
To Activate the account |
|
Inactivate |
To inactivate the account |
Accounts may have been active in previous years, but are not needed for the current fiscal year. You may make an account inactive if there is no activity for the account in the current fiscal year.
By making an account inactive, it cannot be used for entering new journal or distribution transactions. However, an inactive account is retained in order to produce financial statements and to view account details for past years.
In order to prevent an inactive account from being entered on a transaction in a module besides G/L, you should delete it from Valid G/L accounts. If an account is inactive, still in the Valid G/L accounts and it is used on a transaction, the account data will be pulled into G/L when Get Distributions is run. When this occurs the account will automatically become active again.
|
Format |
Button |
|
Example |
This field is skipped during the entry of a new account and defaults to Active. |
This is the Trial Balance (T/B) subtotal level. You can enter a number from one to nine, or press <Enter> to specify that a subtotal will not be printed under this account. Refer to the Subtotal Levels section in the chapter introduction.
|
Format |
9 |
|
Example |
Press <Enter> |
This is the financial statement type, which defines the account as either a balance sheet account or an operating statement account.
Asset, liability, and equity accounts are balance sheet accounts. Revenue and expense accounts are operating statement accounts.
Options
Enter either:
|
Balance sheet |
Balance sheet account |
|
Operating statement |
Operating statement account |
The correct identification of the account is vital, since other selections depend on this information.
|
Format |
Drop down list |
|
Example |
Select Operating statement |
This is the Source and Application of Funds (SAF) type. The SAF type is required for each balance sheet account if you intend to automatically generate the Sources and Applications of Funds Statements.
This field is skipped for a operating statement type account.
Options
For a balance sheet type account, enter a SAF type:
|
Cash |
Cash account |
|
Non-cash charge against income |
For non-current accounts (for example, accumulated depreciation) |
|
Current asset |
Except cash |
|
Current liability |
Current liability |
|
Funds flow |
Basically, these are equity accounts, non-current assets and non-current liabilities |
|
(None) |
If you do not require SAF statements, you may select (None) |
If you have any uncertainty about the meaning of these codes, consult your accountant.
|
Note |
The Source and Application of Funds Statements include the Statement of Cash Flow, the Statement of Changes in Financial Position, and the Analysis of Changes in Working Capital. SAF statements supplement the Balance Sheet and Operating Statement by showing all sources from which funds were obtained and how these funds were used. |
|
Format |
Drop down list, (None) is the default |
|
Example |
Since this is an operating statement account, select <Enter> for the default |
Enter the parentheses control code, which is used to highlight atypical (not typical) account balances on financial statements by enclosing them in parentheses.
Asset and expense accounts are typically debit balance accounts, so you should use parentheses when they have a credit balance.
Liability, equity, and revenue accounts are typically credit balance accounts, so you should use parentheses when they have a debit balance.
Enter either:
|
Enclose when debit |
Use parentheses when debit (liabilities, equities, and revenues) |
|
Enclose when credit |
Use parentheses when credit (assets and expenses) |
For certain accounts, you must use a parentheses control code which is the same as the account’s typical balance. This occurs when an account’s balance appears in parentheses under normal circumstances. For example, contra-asset accounts such as accumulated depreciation appear in the assets section of the Balance Sheet, highlighted by parentheses.
See your accountant if you have any questions about this.
|
Format |
Drop down list |
|
Example |
Select Enclose when debit |
When you run Summarize general ledger, individual entries are compressed (summarized) either for a single day, for a particular accounting period, or not at all. See Summarize General Ledger for how accounts are summarized.
You may not have to run the summarize general ledger because you may compress your data on-the-fly when running either Trial Balance or View Accounts. In both cases you may select to compress by date, period or document number. When you run a Trial balance you may also use this code entered here to summarize the account(s).
The code you enter determines which compression method is to be used for this account.
Options
Enter one of:
|
By date |
Date (consolidate all entries for a single day) |
|
By period |
Period (consolidate all entries for a single accounting period) |
|
(None) |
No compression (retain all entry detail) |
|
Format |
Drop down list, (None) is the default |
|
Example |
Select By period |
This information is needed for the Expanded Cash Flow Statement (also known as the FASB 95 Cash Flow Statement). According to the standards, all changes in cash accounts are to be accounted for in one of three categories.
Options
Enter a category as follows:
|
Operations |
Operations (such as revenue and expense accounts) |
|
Investment |
Investment (such as non-current asset accounts) |
|
Financing |
Financing (such as a notes payable account) |
|
(None) |
To show this account is not involved in cash flow (for example, an account for depreciation) |
|
Note |
Later, when you are entering a G/L account on an Expanded Cash Flow Statement layout, you are given a warning message if you have not defined a cash flow type for that account. Thus, for ease of data entry, you should enter cash flow types here for each account to be used on the layout. |
|
Format |
Drop down list, (None) is the default |
|
Example |
Press <Enter> for the default of (None) |
Audit group
Federal group and
Local group
These three fields are optional. They may be used to group your accounts is for printing various types of schedules.
The names are intended to indicate that group codes entered in Audit group will be used to prepare schedules for your auditors, those in Federal group will be used for IRS inspectors, and those in Local group for state tax officials. These associations are purely nominal; and you can use any one of the fields for any purpose.
The system does not maintain any list of valid group codes, so any input is accepted.
Refer to theTax and Audit Schedules chapter for further information, or consult your accountant.
|
Format |
Three characters at each field |
|
Example |
At Audit group, type OS2 (Office Supplies, location 2) |
|
|
At Federal group, type FT1 (Federal tax, type 1) |
|
|
At Local group, type LT1 (local tax, type 1) |
Make any needed changes.
Graphical Mode
After saving or editing a new account, from the Options menu you have the following options:
|
Enter budgets |
To enter budgets for the current account. For more information on entering budgets, see the Budgets documentation. |
| Account notes |
To view, add or edit notes for the current account selected. For more information see Using Notes. |
Character Mode
If this is an existing account, you may also use one of the options:
Options
|
<F1> |
For the next account |
|
<SF1> |
For the previous account |
|
<F3> |
To delete the account |
|
<F7> |
To access more options |
If you choose <F7> to select more options, a selection window displays:
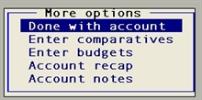
Options
You can choose among the following options:
|
Done with account |
Choose if you are done. |
|
Enter comparatives |
Access the Comparatives (Enter) screen. Refer to the Comparatives chapter. |
|
Enter budgets |
Accesses the Budgets (Enter) screen. Refer to the Budgets chapter. |
|
Account recap |
Accesses the Account Recap screen. |
|
Account notes |
Accesses the Notes screen (described below). |
Use <Up> and <Down> to move the highlighted bar to your selection. Press <Enter> to select it.
You have the option to enter notes for new or existing accounts. You may also edit existing notes. You can enter an unlimited number of notes about this account.
To enter notes, from the Options menu, select Account notes.
Using graphical mode a screen similar to the following will appear:
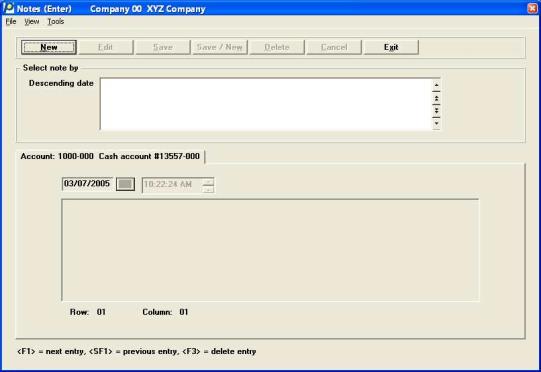
Using character mode, choose Account notes from the pop-up selection window. If you select to use notes, the window looks like:

The Passport Business Solutions notes capability is explained in more detail in the Using Notes section of the Use of Function Keys, Tool Bar and Windows chapter in the System User documentation.
|
Format |
Ten lines of 65 characters each |
|
Example |
(not used in this example) |
The account activity is shown for the fiscal year currently in use, as specified by the Current fiscal year field in Accounting periods. Normally, this is the current fiscal year. However, if you are running G/L in the following year prior to closing the current year, the summary is shown for the following fiscal year.
Graphical Mode
Select the Recap tab to display a summary of account activity, by period, for the account currently shown on the screen. A screen similar to the following will display:
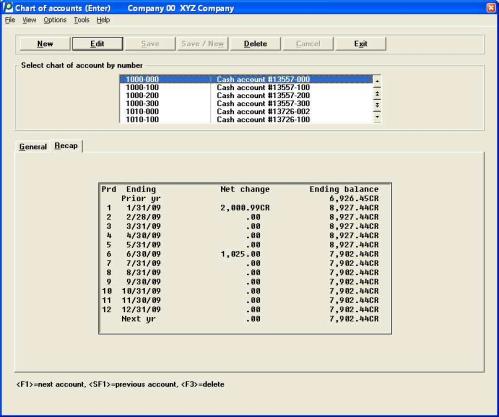
Select the General tab to return to the accounts or select the Exit button to return to the menu.
Character mode
Select Account recap from the More options pop-up selection window to display a summary of account activity, by period, for the account currently shown on the screen.
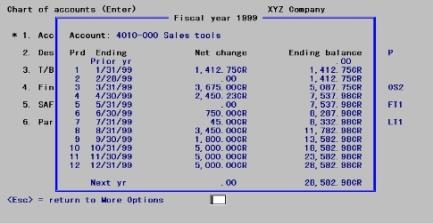
|
Example |
Select Account recap. The account summary displays as shown below. |
Press <Esc> to return to the More options pop-up selection window.
Both active and when present, inactive accounts will be included in this report.
See a sample of the Chart of Accounts List in the Sample Reports appendix.
Select
Chart of accounts from the Reports (lists) menu.
Graphical Mode
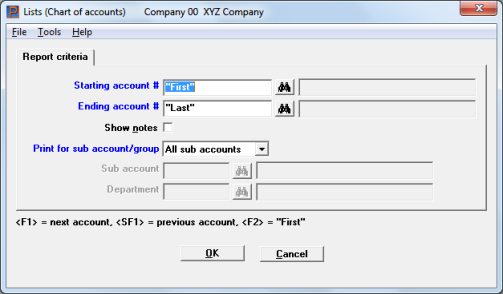
Character Mode
The following screen appears:
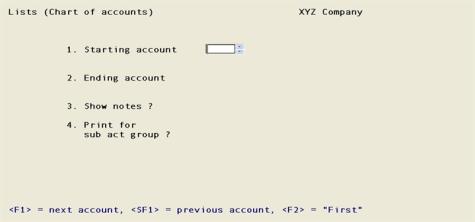
Ending account #
Enter the range of accounts to be included on the list. These are only the main account; subaccounts and cost centers, if any, are specified later. You may use one of the options:
|
<F1> |
For the next main account in Chart of accounts, in account number sequence. |
|
<SF1> |
For the previous account. |
|
<F2> |
For the “First” starting account or “Last” ending account. |
Upon entry or selection of a valid account, the description is displayed of the first entry in Chart of accounts with that main account and subaccount.
|
Format |
Your standard format for main account as defined in Company information |
|
Example |
Press <F2> at each field |
Check the box (answer Y) if you want notes included.
|
Format |
Graphical: Check box where checked is yes and unchecked is no. The default is unchecked Character: One letter, either Y or N. The default is N |
|
Example |
Press <Enter> |
Print for cst ctr (or sub-account)/group
Options
If your company has no cost centers or subaccounts defined, these fields cannot be entered. Otherwise, your choices are:
| Character Mode | Graphical Mode | Description |
|
P |
Sub account or Cost center |
Use for cost center (or subaccount) |
|
G |
Sub account group or Cost center group |
Use for cost center group (or subaccount) |
|
A |
All sub accounts or All cost centers |
Use for all cost centers (or subaccount) |
If you answer Cost center (or Sub account) (P in character mode), you will be prompted to enter the cost center (or subaccount). If your cost centers have two segments, each segment is entered separately. You may also use the following options:
|
<F1> |
For next cost center (or subaccount) |
|
<SF1> |
For previous cost center (or subaccount) |
|
<F5> |
For All cost centers in that segment (or subaccount) |
If you answer Cost center group (Sub account group) (G in character mode), you enter the cost center (or subaccount) group or use the following options:
|
<F1> |
Use for next cost center (or subaccount) group |
|
<SF1> |
Use for previous cost center (or subaccount) group |
|
<F5> |
For All cost center (or subaccount) groups |
If you answer All cost centers (All sub accounts) (A in character mode), all cost centers (or all subaccounts) print.
|
Note |
Printing all groups is not the same thing as printing all cost centers or subaccounts (since some cost centers or subaccounts may not belong to any group, or may belong to more than one group). |
Make any needed changes. When you select OK and a selection window displays where you may select to send the report to the printer, print to disk, html, or display on the screen.
If use of change logs has been specified in Company information, you can print the Chart of Accounts Change Log. This records what changes have been made to your accounts, when they were made, and who made them.
See a sample Chart of Accounts Change Log in Sample Reports appendix.
Select
Chart of accounts change log from the Reports (lists) menu.
A screen with the following field displays:
You can print the log without purging it, in which case accumulated changes are not lost and will appear on the report the next time it is printed.
Check the box or answer Y to purge the change log, or leave it unchecked, answer N, to only print it.
|
Format |
Graphical: Check box where checked is yes and unchecked is no. The default is unchecked Character: One letter, either Y or N. The default is N |
|
Example |
Press <Enter> |
If you have chosen to purge the file, the report is considered a register and may not be displayed on the screen.
There will be a period of processing as the Chart of Accounts Change Log is printed.